
Our original Christmas window scene went viral because my mum drew the whole thing freehand and I shared a stop motion video. I still use some of the same ideas and techniques and we do window decorations every year, there is a project for every holiday window just waiting. This post is here now to help beginners and anyone looking for inspiration updated for Christmas 2025. You do not need to be an artist to make a beautiful Christmas window, and you definitely do not need perfection. Christmas window art works best when it is fun, cosy, handmade and a little bit chaotic in the best way.
Easy Christmas Window Art Ideas
If you want something quick, simple and effective for a Christmas window go for designs that do not rely on symmetry. Snowflakes are perfect because they can all be different and still look good. Stars, baubles and simple geometric shapes work well too. A hanging bauble mural is one of the easiest options. Draw around something circular, like a mug or a plate, and then fill it with patterns. Use multiple sizes to add depth. If you want perfect lettering, print the word in a nice font, Blu Tack it to the outside of the window and trace from the inside.
The beauty of windows is that they are transparent, so you can cheat where you need to. Beginners can print line drawings or silhouettes, stick them to the other side of the window and copy them. Kids can draw their own snowflakes and simple shapes while you handle the trickier bits. Stickers and vinyl decals can be mixed in with hand drawn elements to fill gaps and add interest without extra effort.
Christmas Window Drawing Ideas
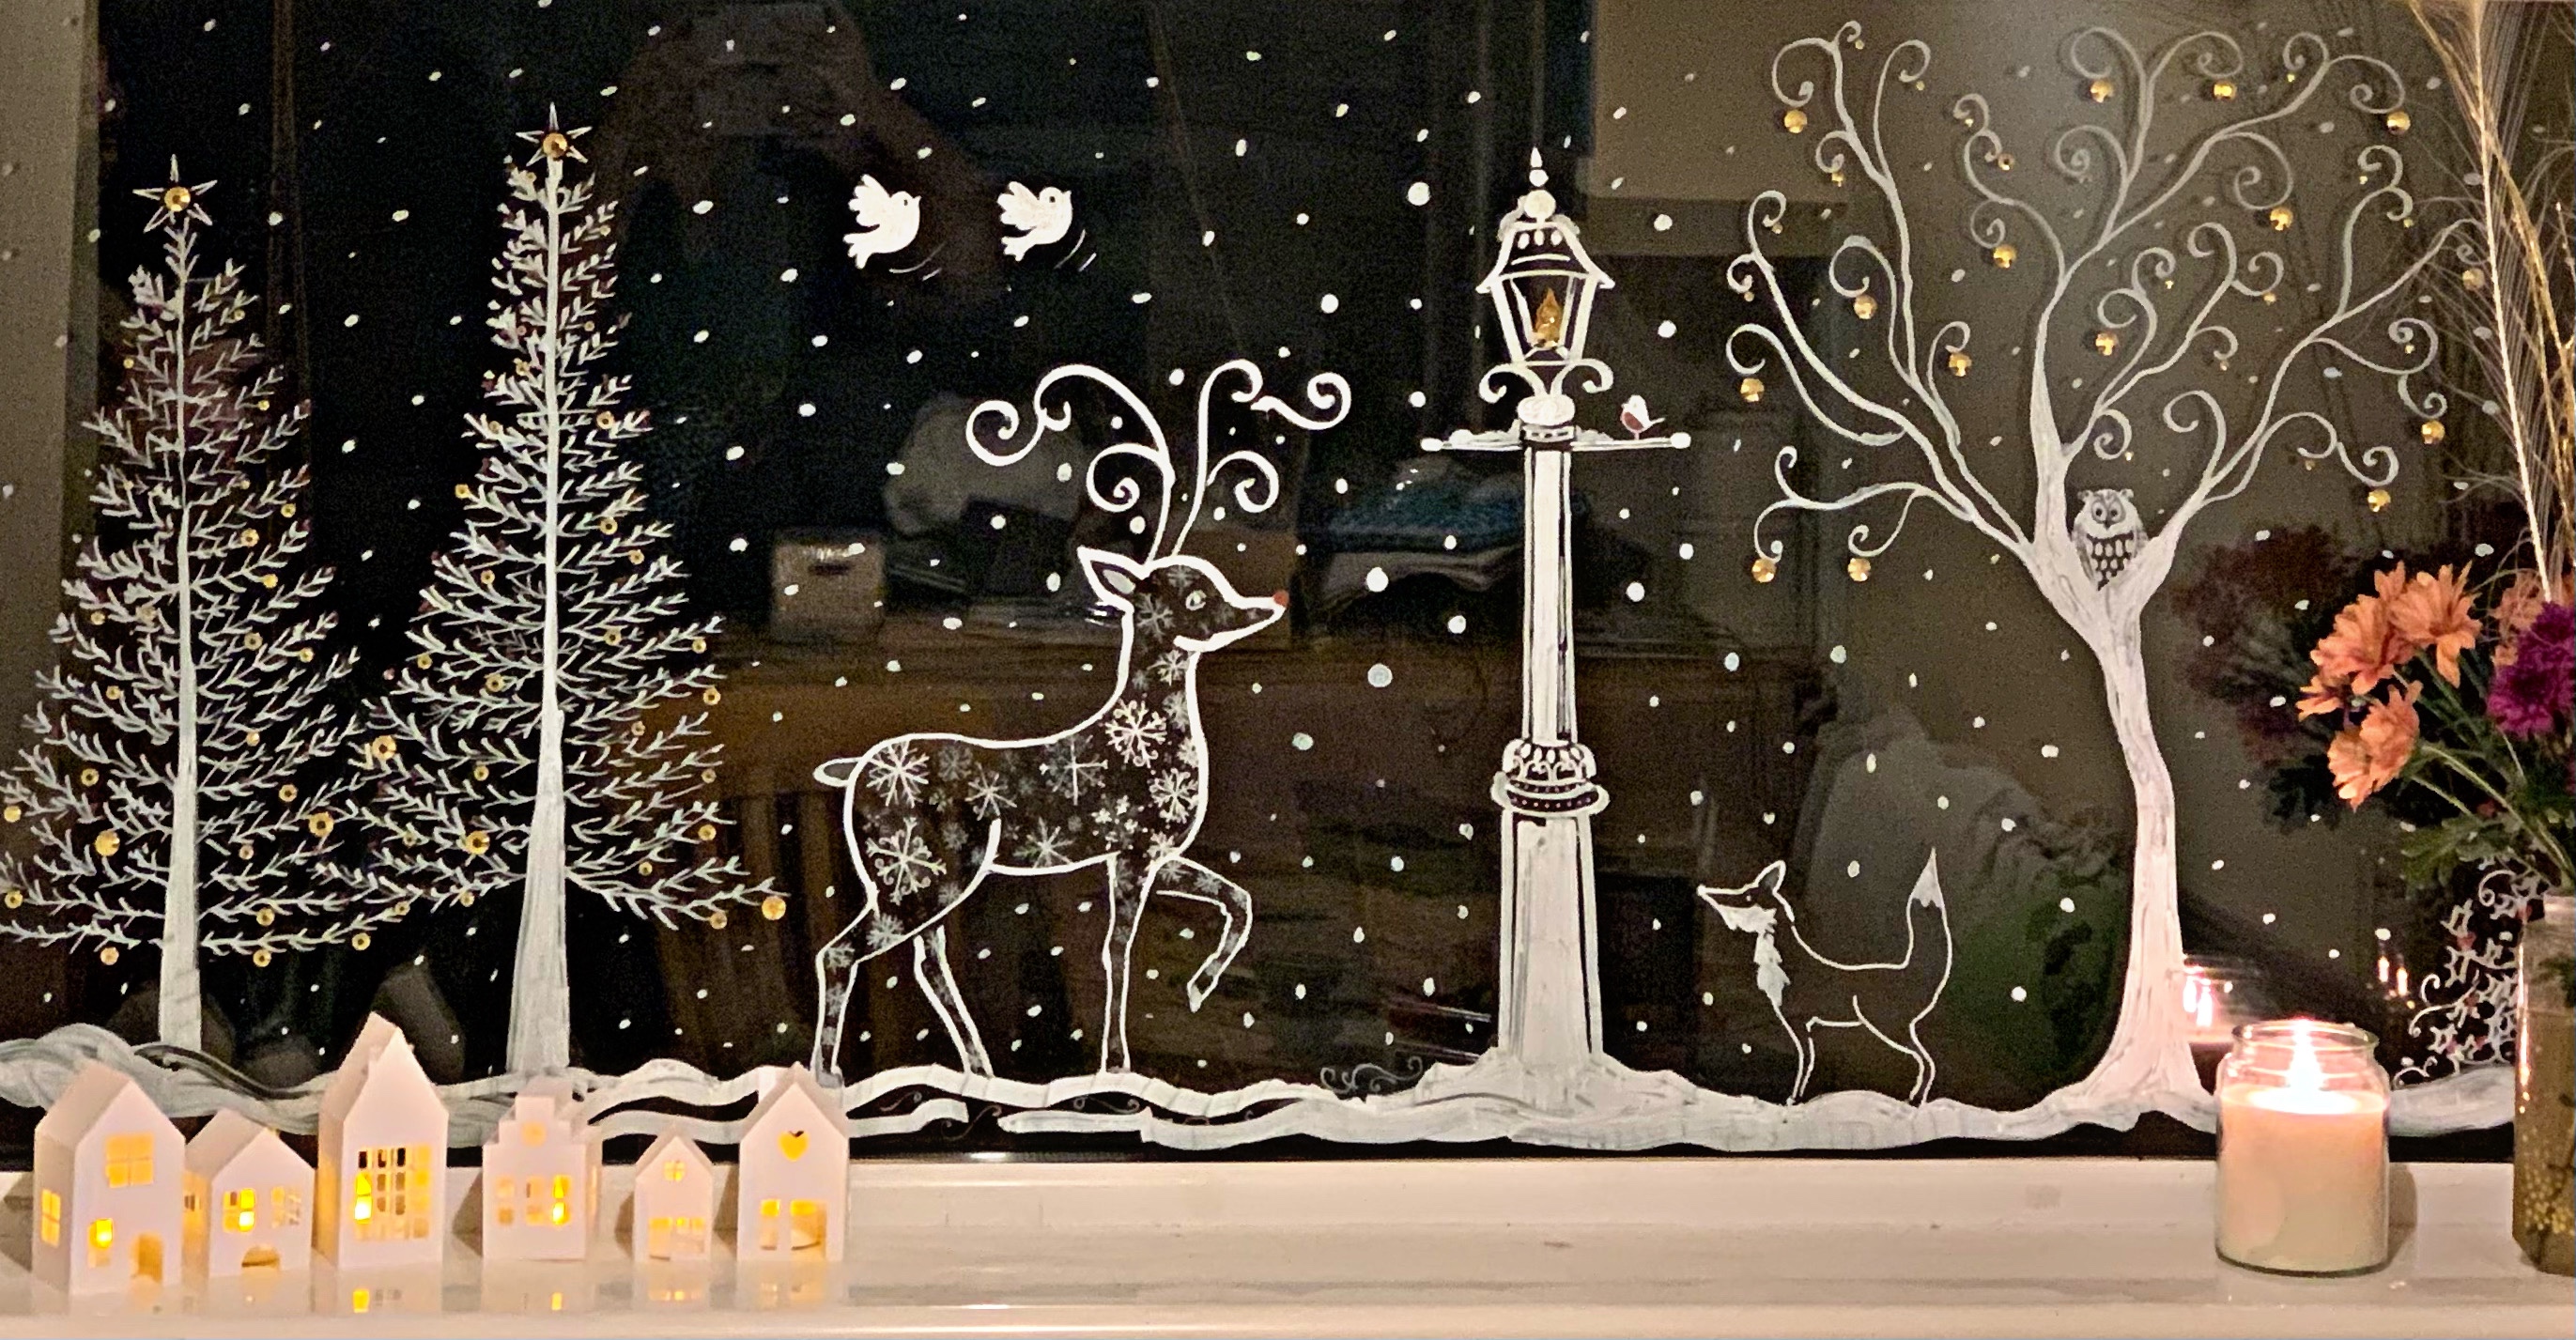
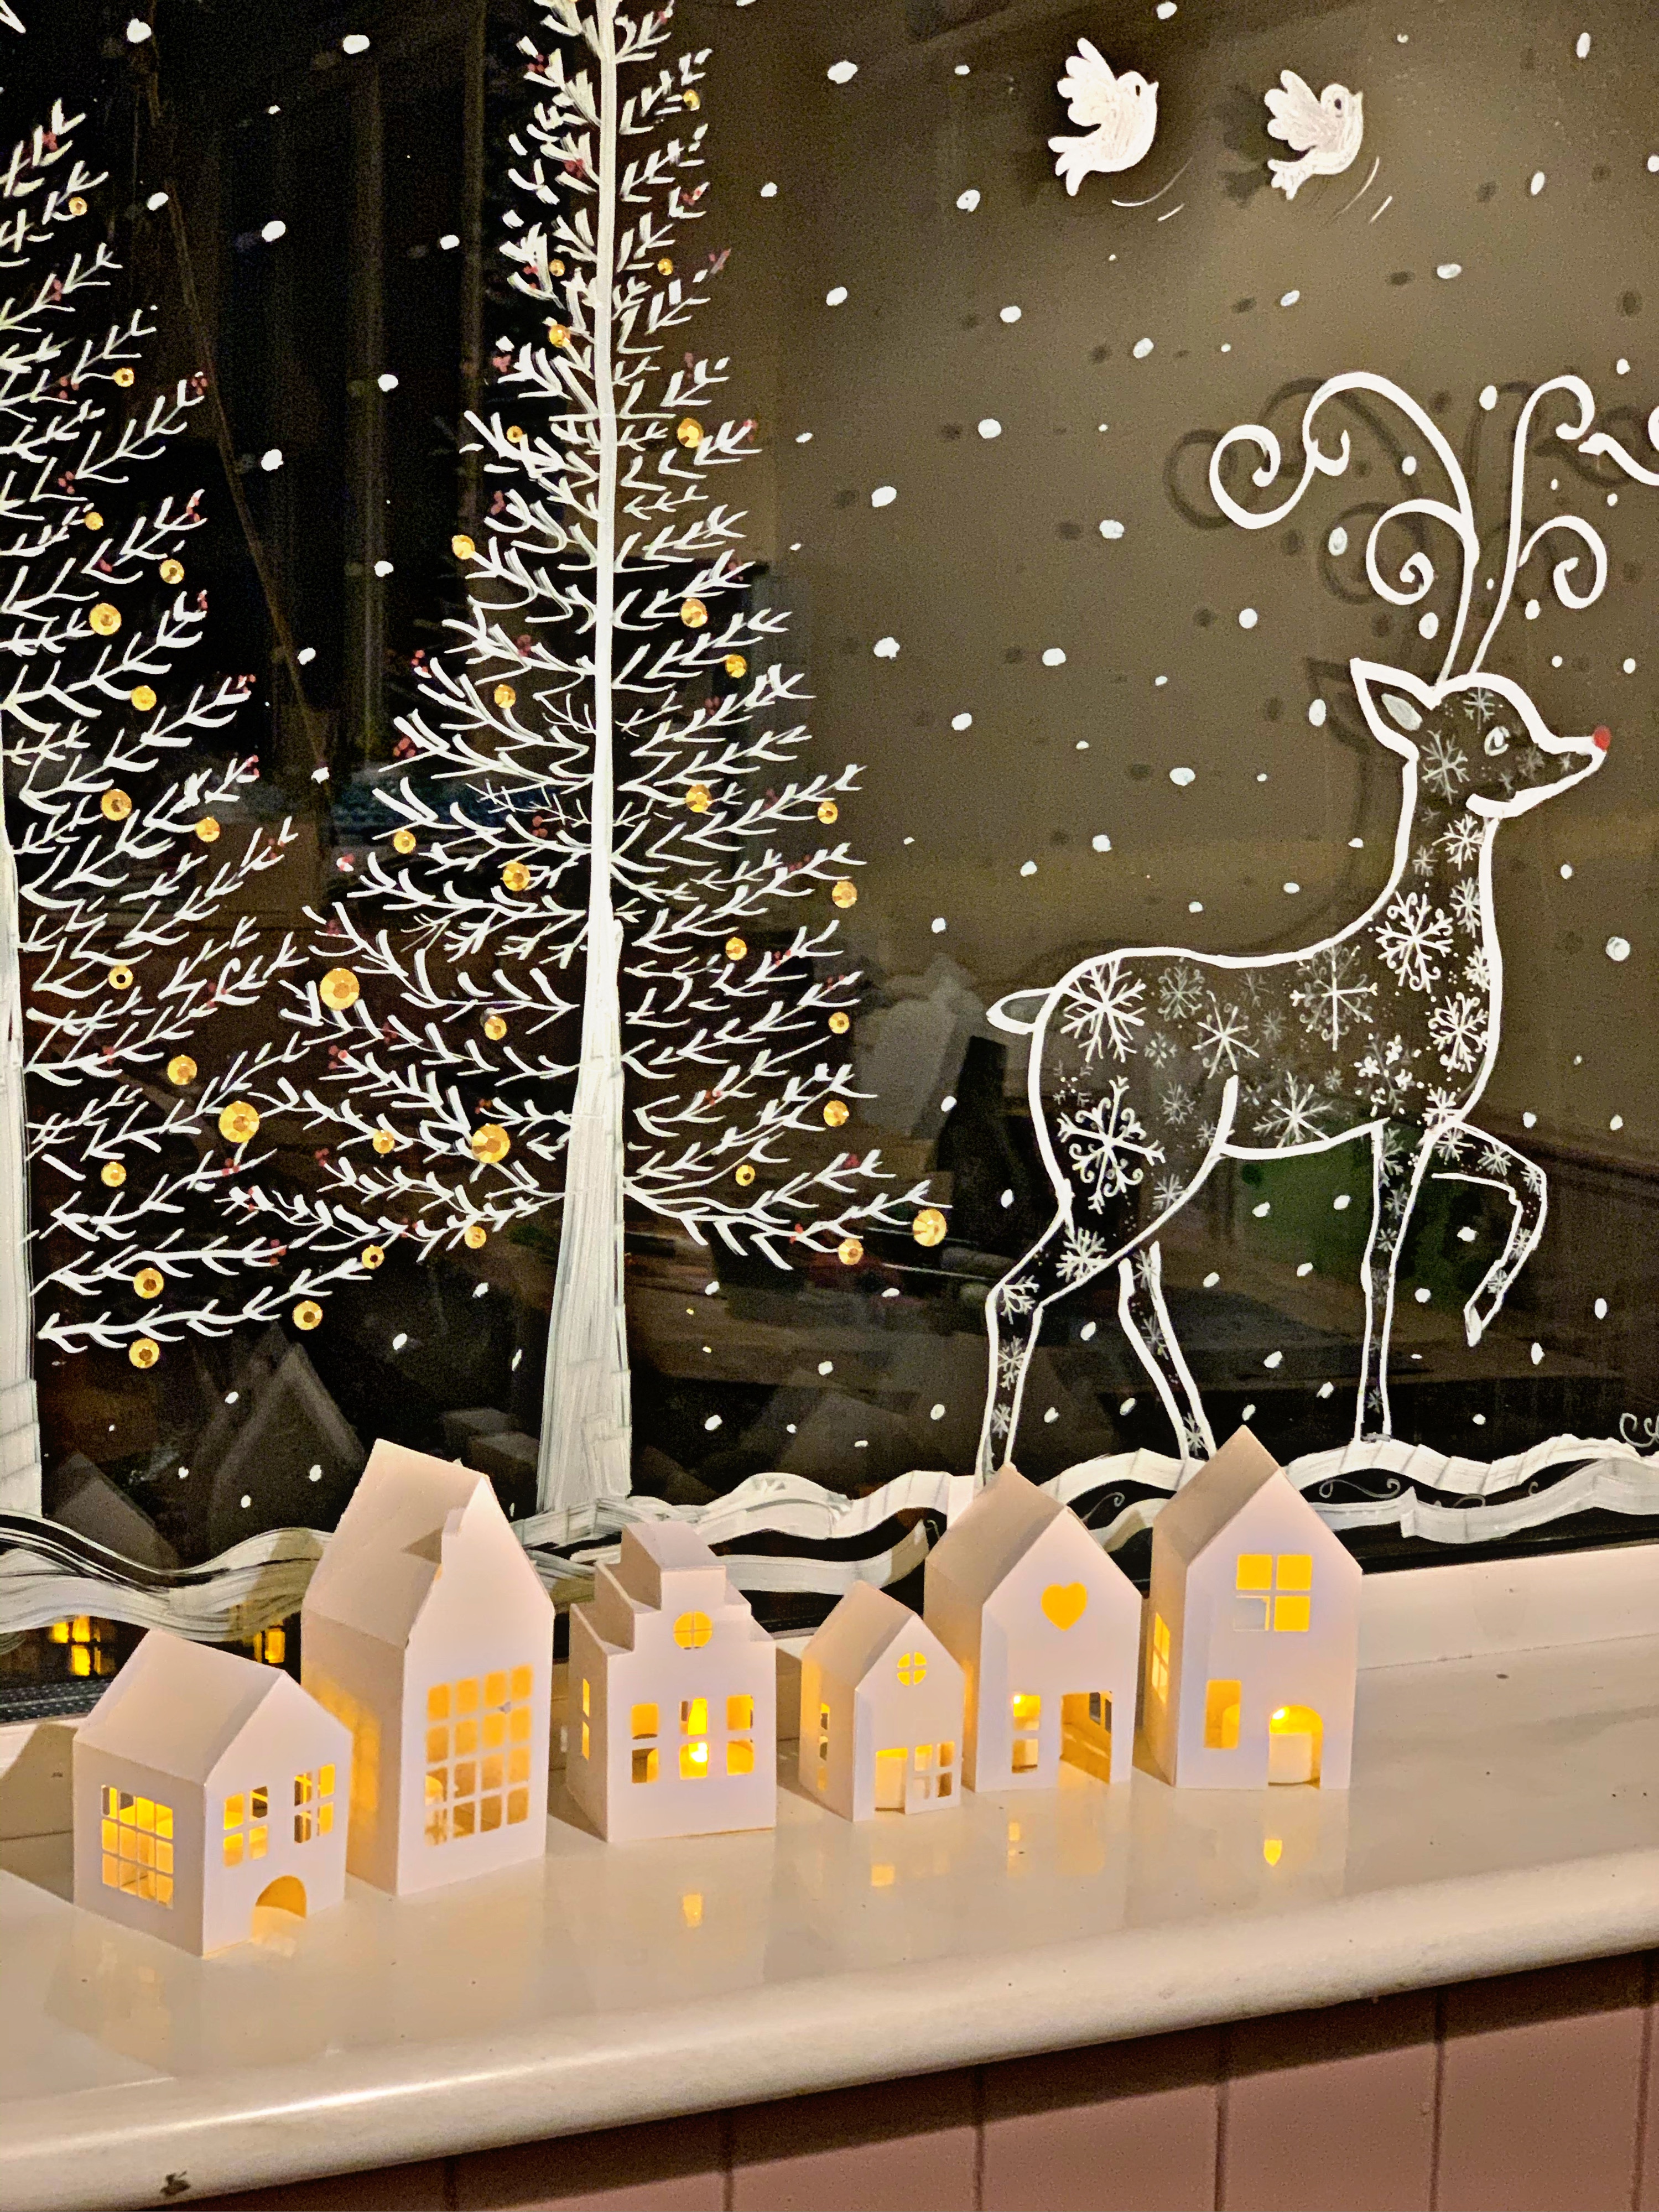
Over the years we have created all sorts of scenes, from woodland animals to nutcrackers to gingerbread villages. Most of the time I come up with ideas and my mum draws everything freehand because she is incredibly talented. It is usually a collaborative effort where we discuss ideas and share pinterest boards for inspiration and plans always evolve as last minute changes often happen. I tend to match the window art to my home decor, so one year we went traditional red and green, another year we went cosy woodland, and another year we went full gingerbread with cardboard houses on the ledge. From about September when stores start to display decorations I get a feeling for trends and colour schemes but we also take inspiration from personal memories and experiences. The nutcracker came about after going to see the ballet and I love seeing installations at light trails which just make my brain burst with ideas.

Getting proportions right can be a nightmare. I have been known to ask for a lamppost inspired by The Lion, The Witch and The Wardrobe, only to realise the deer next to it is the same height. Details can get chaotic, so keep it simple unless you enjoy the challenge. When I draw myself, I stick to very simple designs, usually one colour and very geometric, because they are easier to control. Shapes whcih i can colur in and repeated patterns are fun for me nut my moms worst nightmare so you have to play to your strengths.
Common beginner mistakes include rubbing out chalk pen with a wet cloth and creating drips, or trying to layer opaque paint pens without thinking about how it looks from the outside. Windows need to be drawn flat and one dimensional, because both sides are visible. Unless of course you don’t mind what things look like from one side and can cover it up. Work neatly, but do not panic about perfection. Christmas windows look better when they feel handmade and warm. I love that its the perfect season for crafts and home made gifts.

Chalk Pen Christmas Window Art
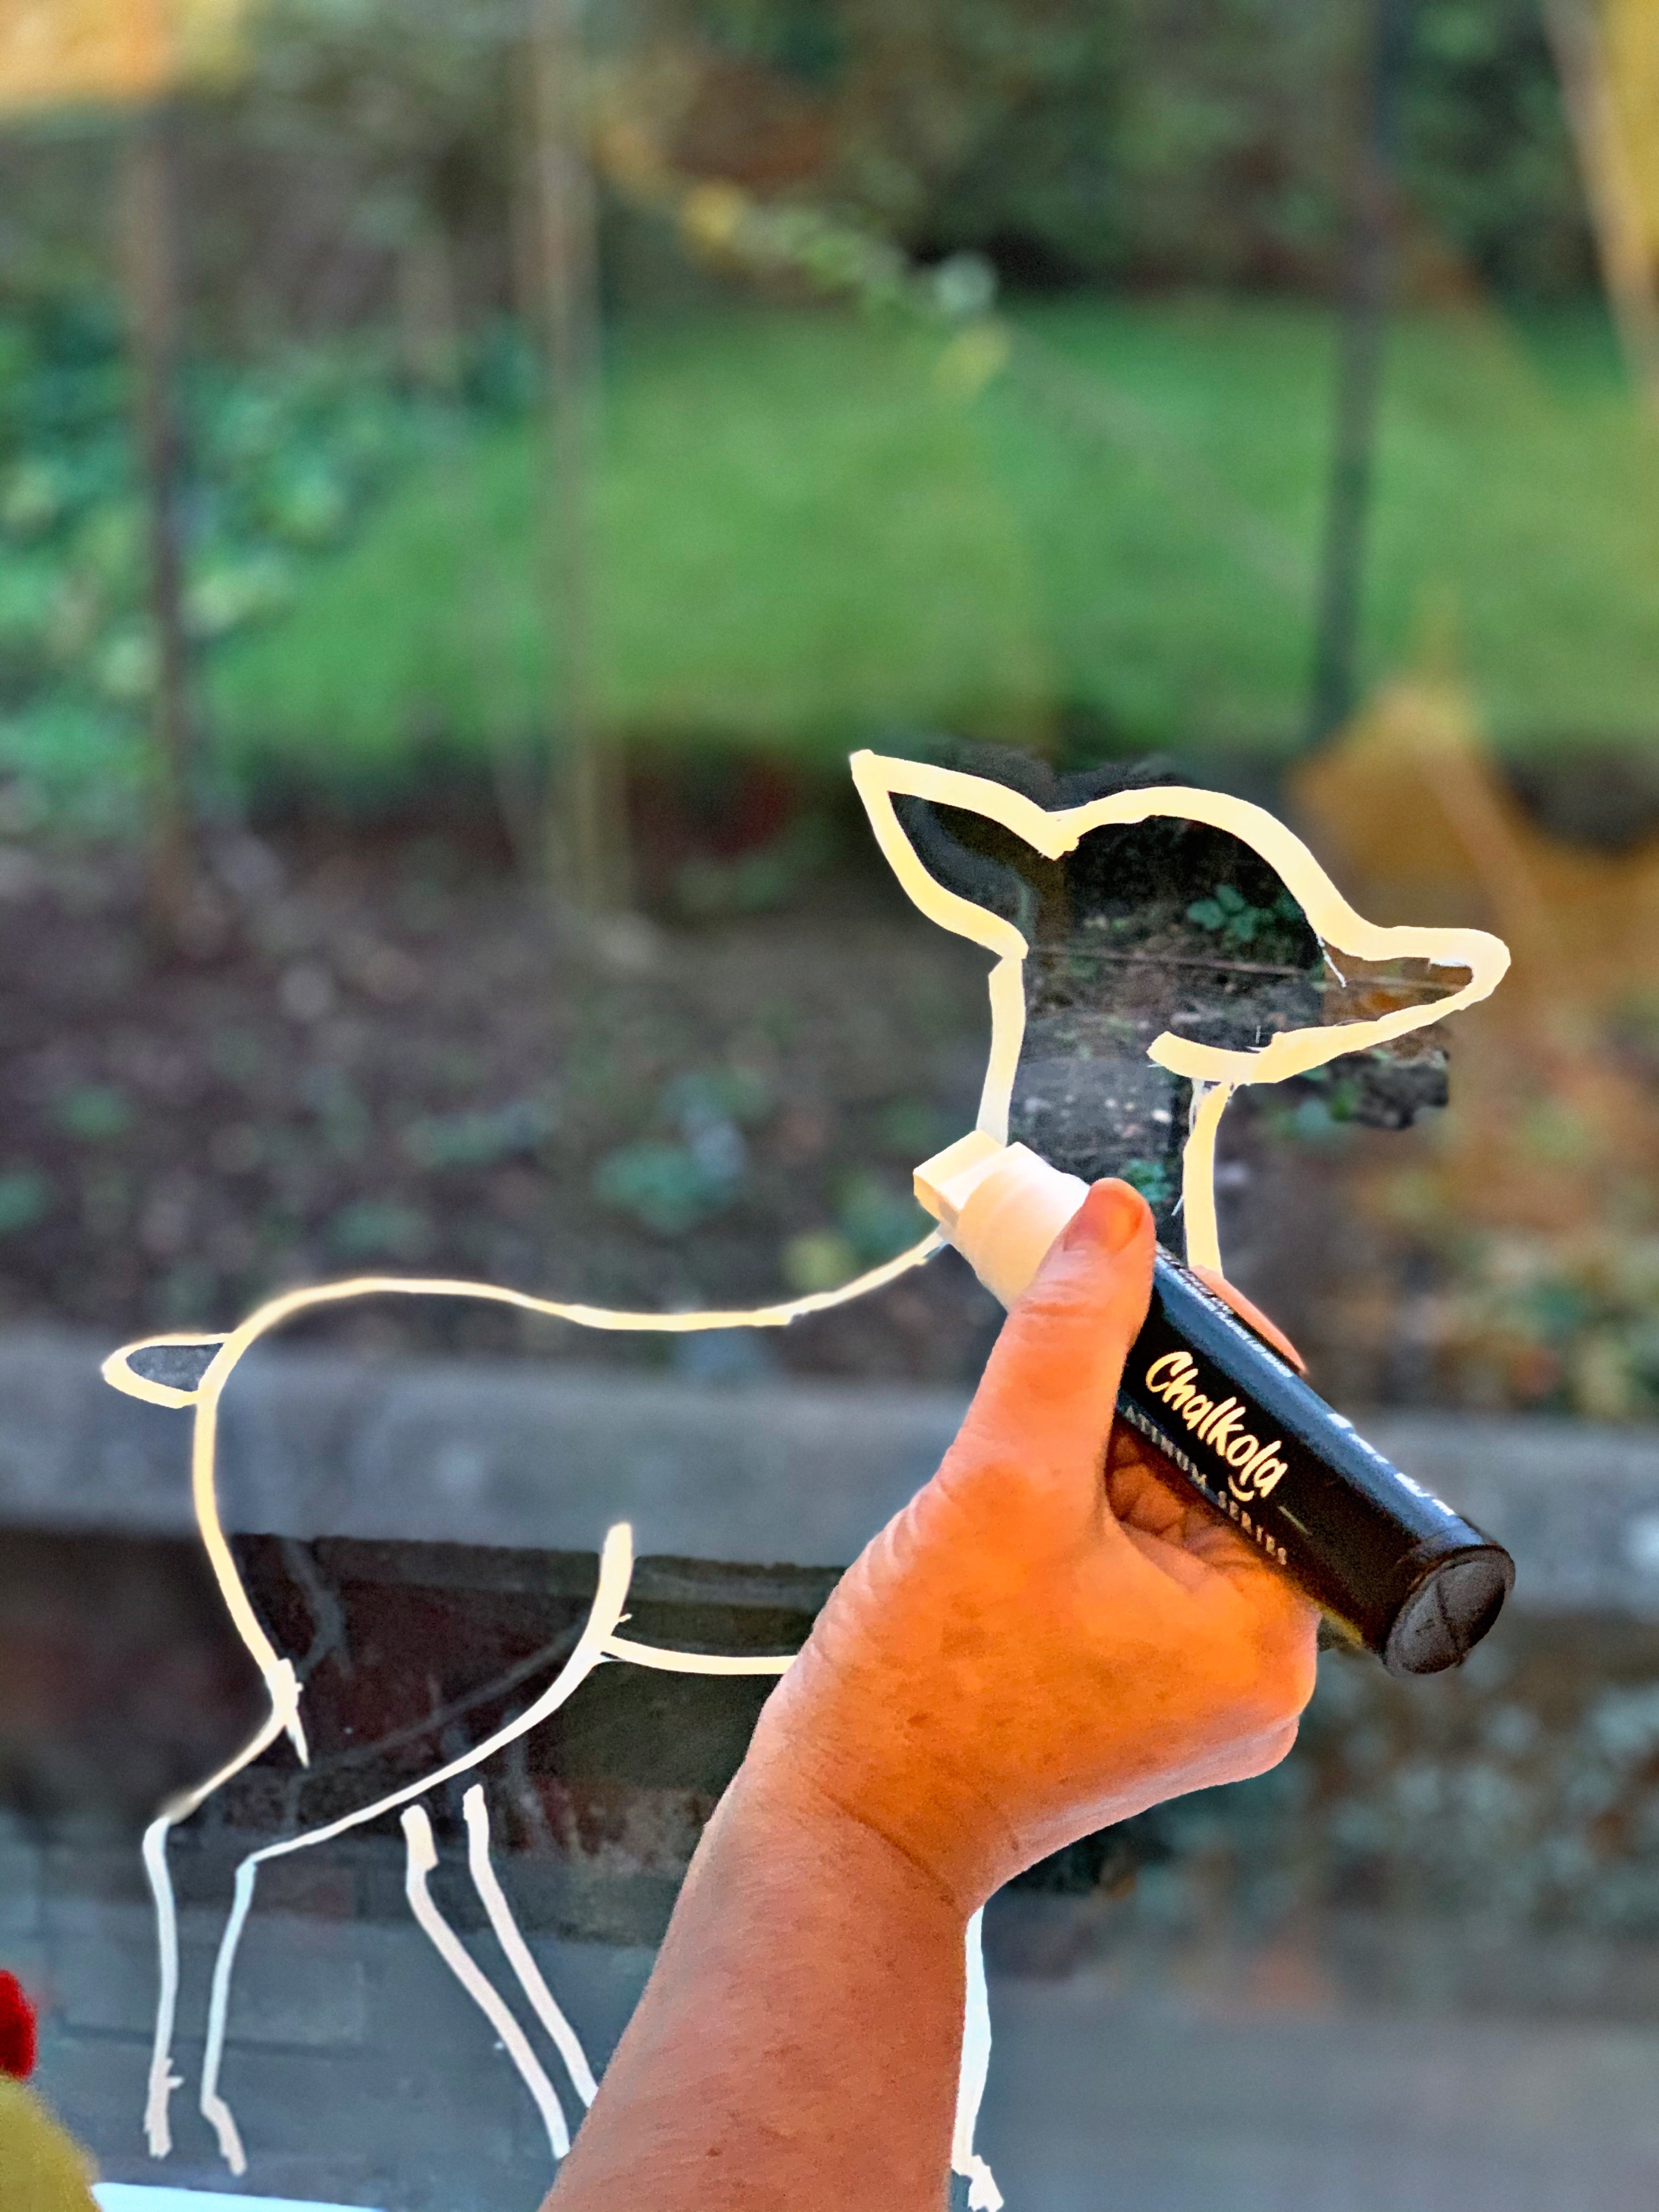
I have used every chalk pen under the sun and Chalkola remains my favourite for chalk effects. There are a vairty of different brands but the quality of the nibs and the pigment and amount of paint can vary wildly. Chalk pens need shaking and priming, which means pressing the nib on scrap cardboard until the ink flows. Do not over prime, or you will get big drips. Also try not to press too hard vertically, because the liquid will run down the glass. Talking from experience here so you don’t have to make the same mistakes I have. Chalk pens are quicker to remove than paint pens, but they still need effort.
If you want clean lines, try outlining in a pale colour like white or grey first, then go back in with darker accents. Keep baby wipes, cotton buds and a dry cloth nearby. A wet cloth makes drips, so avoid that unless you are cleaning the whole window. If a mistake happens, dab it rather than wiping across.The last thing you want is a big smudge on your window. Try turning lights on and off and shining a torch light up against a window to catch any evidence of paint smears.
Arlo usually gets the windows at the back of the house to work on, which means he can go wild without me worrying about what the neighbours will think. When he was little he drew so low down on my patio doors you could not see any of it behind the sofa, which I had to move to make space for the Christmas Tree. Let the kids draw their own designs. Include them in the creativity, it keeps them happy and makes the whole process feel magical and fun.
Painted Christmas Windows
I have used acrylic paint, glass paint, washable kids paint and paint pens. I feel like I can give some solid advice here. Acrylic paint gives bright colour but I will not lie – it is much harder to remove. Glass paint should be avoided unless you want something permanent. Washable kids paint does not look as good because the pigment is weak and you get streaks and transparent patches.
Posca paint pens are brilliant for detail and colour strength, these are my go to and I have my favourite colours in multiple sizes – but they can run out mid design if you are covering a large surface. Admittedly these are expensive pens but there are affordable paint pen alternatives available Always check your pens before you start. If you want bold colour, you can outline first or add a second layer, but remember that anything you layer changes how the window looks from outside. If you paint a white base under your colours, the outside view will not match the inside. This is fine for home windows but a problem if you want a consistent outside view, for a Christmas shop window for example.
Kids can use paint pens, I actually love this as theyre super chunky to hold and one single colout but whatever you do, do not give them a selection of liquid paint and a brush unless you are prepared for a brown smudge disaster. Fine for their art projects from nursery but not for windows. Paint pens are more controlled and create less mess.
Removing paint involves scraping with a credit card or blunt blade. Plus time, and elbow grease. There is no sugar coating this – it will take you longer to take off than you imagine. Chalk pens are easier but still need effort. None of them wipe off effortlessly, so make sure you only remove them when you have time and patience.
Christmas Window Displays and Decoration Ideas
Window displays are my favourite part. Once the window has been painted it is time to frame the project and add the finishing touches. I have long windows so I go all out. Garlands and fairy lights look amazing, especially battery powered ones you can tuck into curtain rails or ledges. I drape garlands up and around the window, mix in lights, and create a cosy glow.
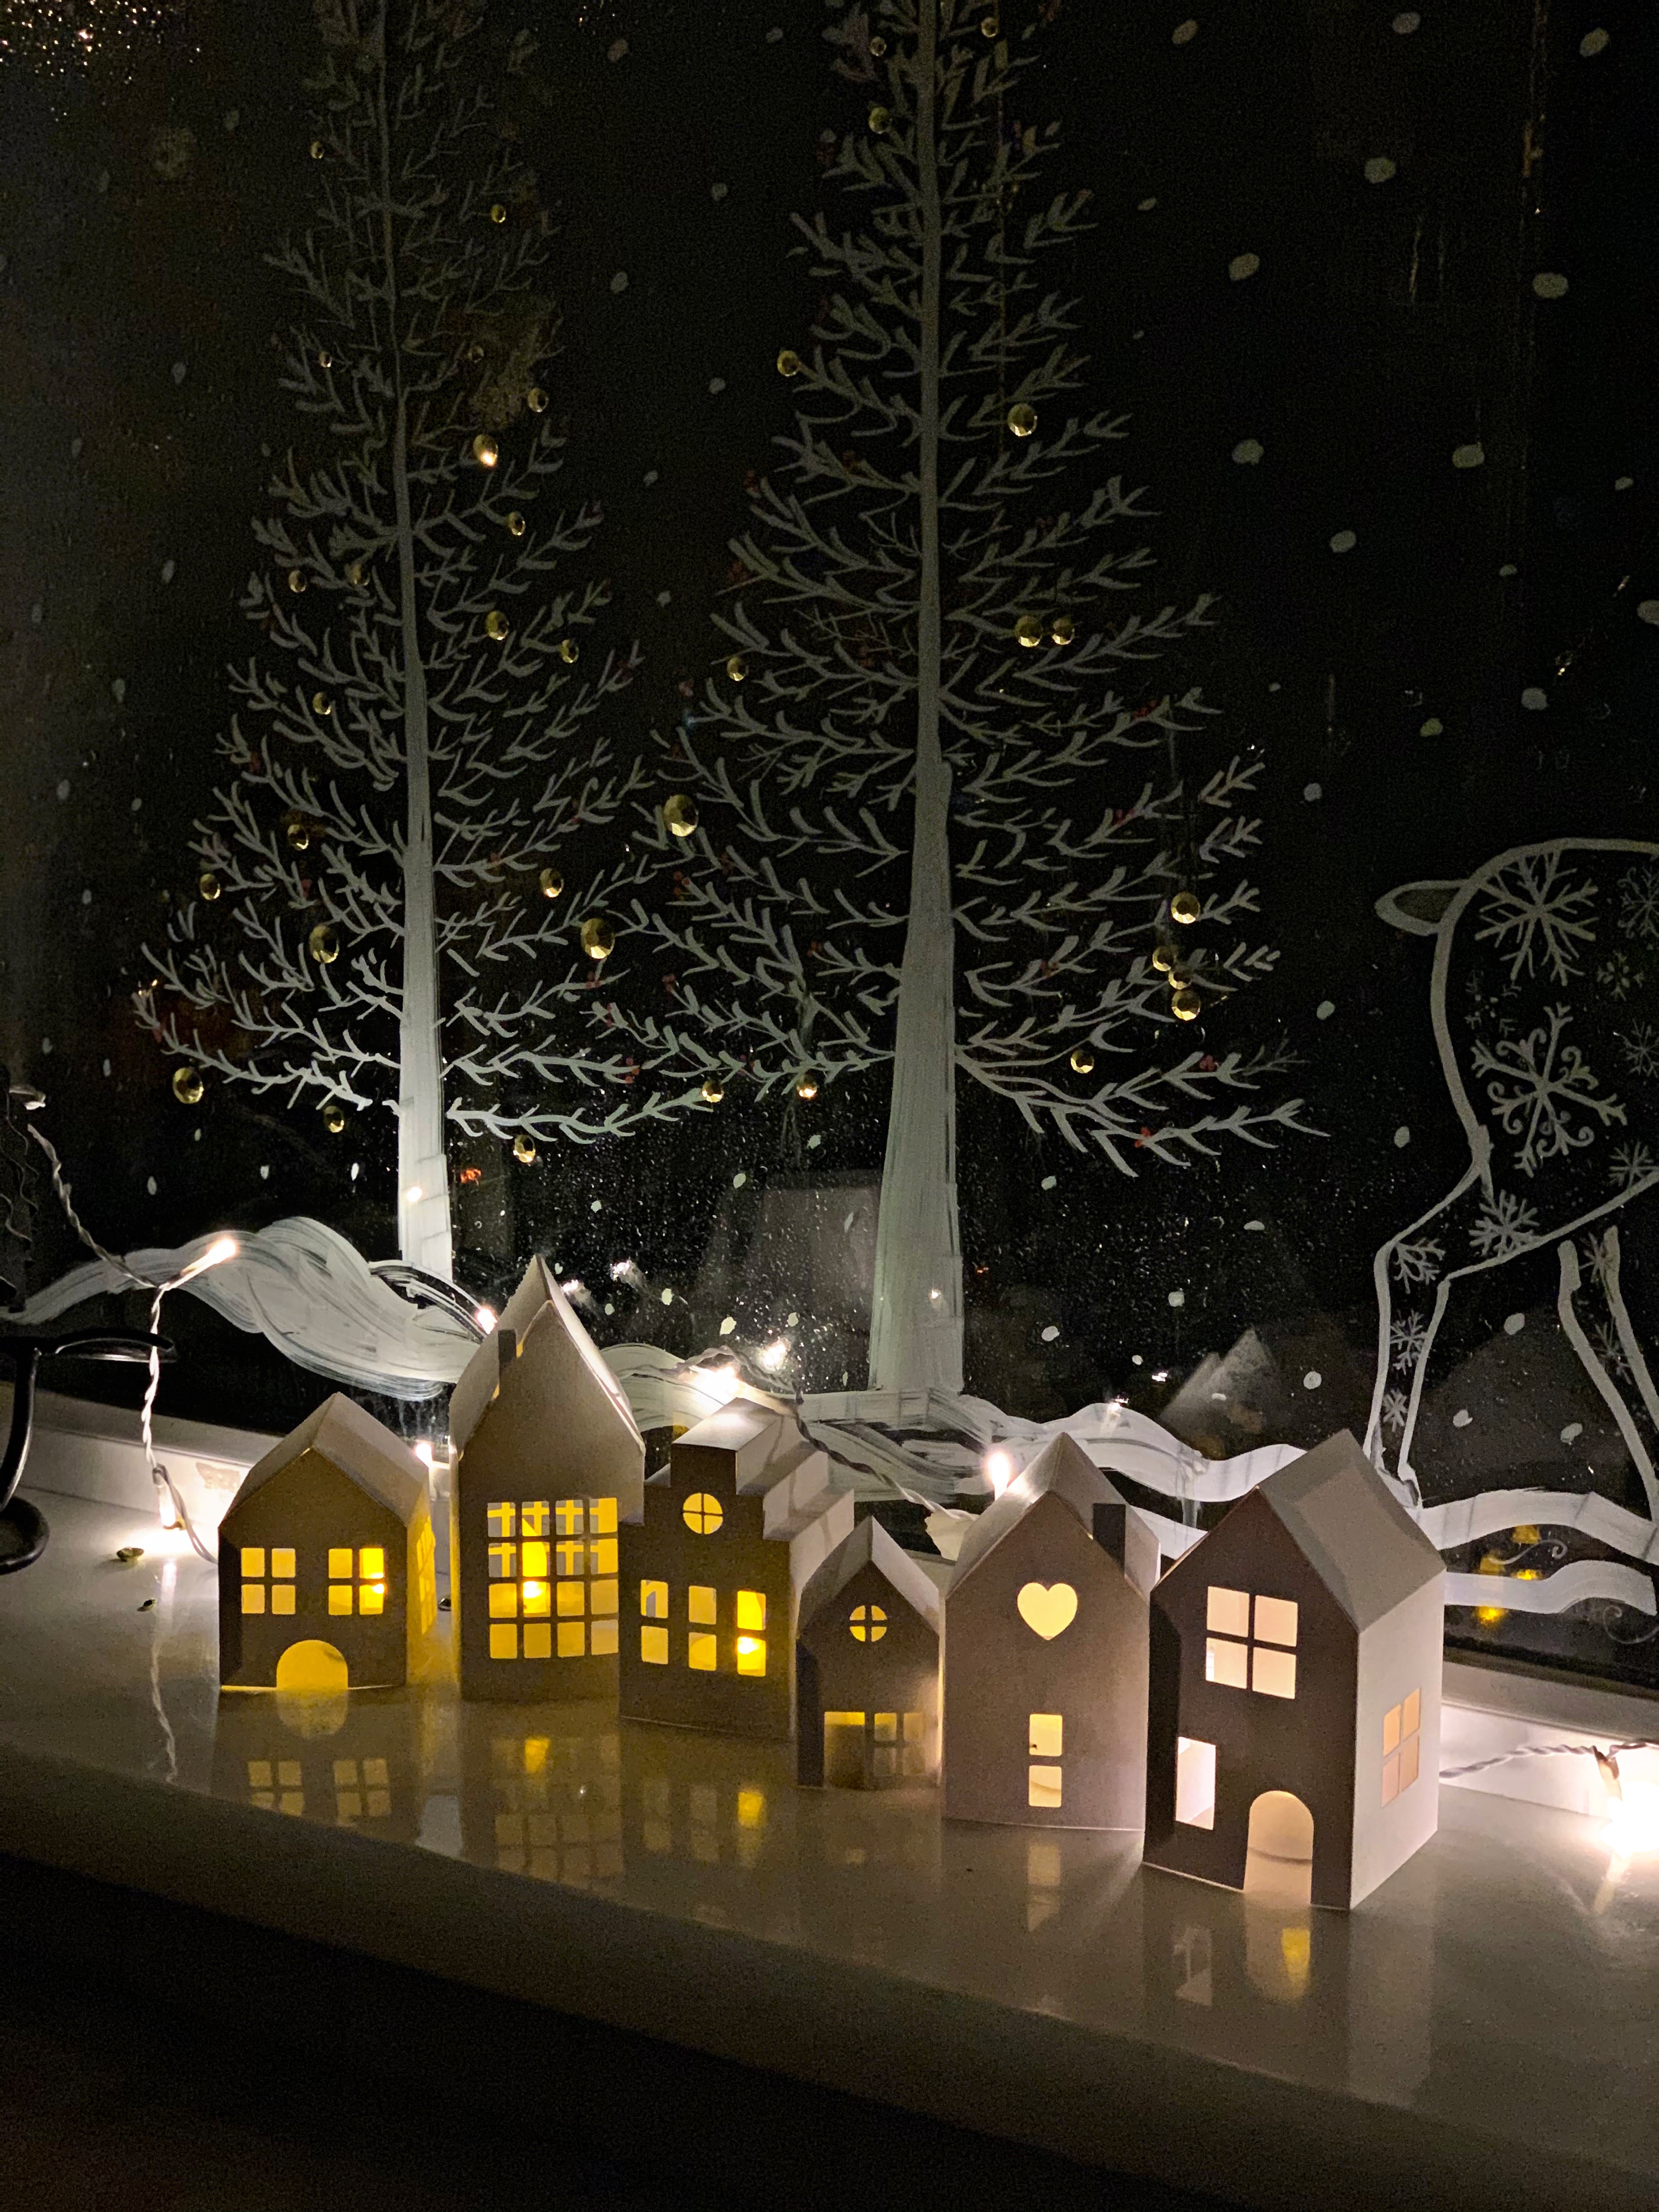
On the ledge itself I love displaying things like previous Christmas cards that I keep hold of and bring out every year, the keepers usually being the christmas cards with family photos on them, as well as paper house lanterns I have made with LED tea light candles inside. Plus of course the multitude of handmade crafts, clay ornaments, all the Cricut Christmas projects and anything Arlo has brought home from nursery or school. My decor in recent years has been very rainbow themed so I add giant glitter baubles and even a big pink sequin flamingo. I always turn off battery lights and use strong thread like fishing wire for hanging decorations.
Paper snowflakes hung from hooks in window alcoves look beautiful and cost nothing. I like to sit and do these on cold winter afternoons whilst watching a movie. Paper fans, honeycombs, garlands and all sorts of high street bargains can fill a window quickly. You can go traditional with holly and berries, retro with foil decorations, or full camp, colourful chaos. Christmas is the one time of year you can be as over the top as you like.

Lighting also makes a massive difference. Warm white fairy lights create a cosy glow, while rainbow lights add magic. I personally avoid blue lights because they look like emergency sirens reflected in the glass. I try to match my Christmas tree so it’s cohesive throughout my home and I also take in to consideration the interior decor, including the Crib of Art gallery prints already on the walls. One thing I will say is last year I placed Arlos Advent calendar on the window and chocolate wrappers left on the ledge drove me mad, so expect a bit of chaos if you have kids.
Free Christmas Window Templates
I use templates for lettering because I care about spacing and want neat words. I print out a font I like in the perfect size, tape it to the outside of the window and trace it. For kids designs, Twinkl is great. I use Pinterest, Google Images, Instagram, my Cricut library and anything else with clear line drawings.
When tracing, it is best to stick to silhouettes or simple shapes. Snowflakes, baubles, nutcrackers, gingerbread houses and Christmas trees always turn out well. If you want a bauble shape you can draw around a plate and then fill it with any pattern you like. Do not use Sellotape on the window as it leaves sticky residue. Use Blu Tack, masking tape or painter’s tape instead. Again another tip from personal experience!
How To Create a Christmas Window Art Scene
Start by measuring the window and sketching your idea on paper. Get the proportions right from the beginning. If the layout does not look right on paper, it will not look right on the glass. Choose a theme and gather your supplies. Make sure you have all the colours you want before you begin. Less is more!
Clean the window with glass cleaner and a lint free cloth. Fluffy cloths will leave bits behind that get stuck in the pen nibs and ruin your lines. Make sure teh window is nice and dry and you check that it’s clear from a few angles and with lights on and off because once you start it’s a nightmare to remove any streaks. Patch test your colours on the window to see how they look in different light. If you have greenery outside, a green design will blend in and disappear.
Have snacks, drinks, scrap cardboard, a white card for priming pens, tissues and any stencils ready. Put on Christmas music or a festive movie to get in to the spirit of things. Make it fun. It takes a while and can be quite tiring so you need to do whatever it takes to keep the spirit up. My mum usually comes around and we do it together in one long evening of four to five hours with a snack break in the middle. Lots of chat and I’ll cook us something nice to eat too.
Start with outlines, plot the main components out before you fill in shapes, then you can add the details. Don’t forget to check how your curtains tie back because you can lose some of the design from the edge. Leave snowflakes for last because they fill gaps neatly. Step back regularly to view the design from inside and outside to make sure it looks balanced. Do not rush the process. The only true disaster is running out of pen ink halfway through, so check your pens the day before.
One more favourite feature of all of our windows is the tiny little details. Arlo is a huge animal fan so hiding tiny creatures in the artwork for him to spot is something we have done on many occasions. We have also done things like added family pets or a specific colour of scarf or hat to represent a family member. These kinds of things just bring a smile and add meaning.

The overall level of detail and finished appearance of this window is awe inspiring – it was so much fun people watching that year as everybody who walked past paused to look inside – this was especially important in 2020 when the world was in such a difficult situation where communication was limited due to social distancing. It was our way of maintaining a sense of community, sharing the festive spirit and bringing some positivity in to our lives. It really was a special window so I’m glad it’s getting the attention it deserves, long after it has been wiped clean.
Each year we look forward to adding something new to our window displays, and the fun doesn’t stop at Christmas. Imagine what we come up with at Halloween!

Hints and tips to create your own Christmas Window
1. Gather Your Supplies:
Start by collecting the necessary materials. Invest in high-quality paint or chalk pens with a range of colors suitable for Christmas themes. Ensure the pens are suitable for glass surfaces to achieve vibrant and lasting results. You’ll also need window cleaner, a soft cloth, and perhaps stencils or templates for intricate designs.
2. Prep Your Surface:
Clean your window thoroughly using a window cleaner and a soft cloth to remove any dust or residue. A clean surface ensures better adhesion for the paint or chalk and allows your designs to stand out vividly. The last thing you want is to notice smudges after you’ve started as it really distracts the eye.
3. Plan Your Design:

Before diving in, plan your window design. Consider the overall theme you want to achieve—whether it’s classic Christmas motifs, winter wonderland scenes, or a whimsical display. Sketching your ideas on paper beforehand can help you visualise the layout and ensure a cohesive and balanced look.
4. Create Stencils or Templates (Optional):
If you’re aiming for detailed or symmetrical designs, consider creating stencils or templates. This step adds precision to your artwork and allows you to replicate specific shapes or patterns consistently. Stencils can be crafted from cardboard or purchased pre-made. One thing I always laugh about with my mom is that I am a stickler for the placement of text / wording. I will measure with a ruler and my moms freehand swirls stress me out!

5. Start with a Base Layer:
Use the paint or chalk pens to create a base layer on your window. This could be a snowy landscape, a starry night, or a simple frame for your design. The base layer provides a foundation for your decorations and sets the tone for the overall aesthetic.
6. Add Festive Elements:
Now, let your creativity shine as you add festive elements. Draw Christmas trees, snowflakes, ornaments, stockings, or any symbols that resonate with the holiday season. Experiment with colors to evoke the warmth and joy of Christmas. Consider outlining your designs with a contrasting color to make them pop.
7. Incorporate Text and Quotes:
Inject some holiday cheer by incorporating Christmas quotes, greetings, or even lyrics from your favorite carols. The use of elegant fonts or playful handwriting can add a personalized touch to your window decorations.
8. Embrace Dimension and Texture:
Explore different techniques to add dimension and texture to your designs. Create faux snow by using white paint or chalk to add a snowy effect to the edges of your window. Experiment with shading or layering to make certain elements stand out.
9. Consider a Scene:
Transform your window into a festive scene by drawing vignettes. A snowy village, Santa’s sleigh, or a cozy living room with a fireplace can turn your window into a captivating storybook.
10. Fine-Tune and Add Details:*
Step back periodically to assess your progress and fine-tune details. Add small touches like holly berries, twinkling stars, or intricate patterns to enhance the overall charm of your window decorations.
11. Seal the Artwork (Optional):
If you want to preserve your window art for an extended period, consider using a sealant or clear acrylic spray. This helps protect your artwork from smudging and fading over time.
12. Share the Joy:
Once your window is adorned with Christmas magic, share the joy with neighbors and passersby. Your festive window display can become a beacon of holiday spirit for the entire community.
Finally, if you have the space on a window ledge then adorn it with festive bits and bobs to add depth, and also consider your lighting. Fairy lights will make sure your window glows and will be seen from outside.
Chalkola for chalk pens and Posca for paint pens. These two brands give the best opacity and colour strength. White always looks best because it pops against the dark outside.
Not really. Chalk pens come off with a dry cloth and elbow grease. Paint pens need scraping with a credit card or a blunt blade. None of them wipe off with a single swipe.
Avoid Sharpies, permanent markers, ceramic pens, glass paint intended for permanent designs and Sellotape. Sellotape leaves horrible sticky marks.
Use baby wipes, cotton buds or a dry cloth. Work slowly and dab rather than wipe. Wet cloths create drips.
Drawing. Paint turns into a brown smudge when kids mix everything. Paint pens are fine because they are controlled, but liquid paint is chaos. Another good alternative is the Little Brian paint sticks – they’re more like a crayon and awesome for kids to hold.
No. The only issue is cleaning. Avoid anything sharp when scraping off paint so you do not scratch the glass surface.
Use chalk pens to make dots, lines and simple snowflakes. Snow spray exists but it is not something I use personally as I can never get it right. Add extra depth by adding dangling decorations.
Then skip the drawing. Buy window decals from Amazon, Etsy or Poundland. Village scenes, snowflakes and silhouettes look stunning and require zero skill. I have seen ideas to suit all themes and these are a lot easier and faster.
It lasts as long as you leave it on. If it is on the inside it can stay for months. Outdoors can fade or get worn down in bad weather. Just avoid putting detailed art on doors or high touch areas where fingerprints build up.
Do not block your natural light. Test your pens before you start. Only remove the art when you have time to clean it properly. Enjoy it. Christmas windows are meant to feel magical, not perfect.
Last Updated on Tuesday, June 9, 2026 by Lavania Oluban